Provision Child AWS Accounts
今天要使用 terraform 設定 AWS account structure
賽後文章會整理放到個人的部落格上 http://chechia.net/

–
Provision AWS Account
今天要把 aws account 設定完成,並且開始使用 live-repository 來搭建 aws 元件
我們自己的 module repository
- 開一個權限的 repository
- fork 我自幹的 modules repository terragrunt-infrastructure-modules https://github.com/chechiachang/terragrunt-infrastructure-modules
- 上面這個是放 terraform module 的 repository,是兩個 repository
- 不要跟執行 terragrunt repository 搞混,是兩個 repository https://github.com/chechiachang/terragrunt-infrastructure-live-example
今天的進度與 code base
- terraform-live-example PR 在此
- terragrunt-infrastructure-modules 請直接看 tag v0.0.1
- 因為有地方嚴重寫錯,我有 force push 東西 :tear:,如果已經提早下載的朋友可能會需要清掉 repository main branch + tag 重拉 orz
對,我們且戰且走常常會這樣,發現昨天寫的東西寫錯臨時改,請大家見諒
為何使用 aws modules
X) 因為我們沒有付錢,不能用 gruntwork 的 priviate repository (大誤
O) 因為我們想要使用開源版本的 terraform module (XD)
我們快速看一下 module 裡面的內容 https://github.com/chechiachang/terragrunt-infrastructure-modules/tree/v0.0.1/aws/modules/account-baseline-root
resource "aws_organizations_organization" "org" {
  aws_service_access_principals = [
    "cloudtrail.amazonaws.com",
    "config.amazonaws.com",
  ]

  feature_set = "ALL"
}

resource "aws_organizations_account" "account" {
  for_each = var.child_accounts
  name  = each.key
  email = each.value["email"]

  depends_on = [
    aws_organizations_organization.org
  ]
}
我們的需求
- 在 root account 下 provision 一個 aws organization
- 為每個環境 provision 一個 aws organization account
- 使用 terraform
for_eachfunction 來迭代 variabel 傳入的 organization accounts (型別是 map) - each.key 會拿到每個 map element 的 key,例如
  child_accounts = {
    logs = {},
    security = {},
    shared = {},
    dev = {},
    stage = {},
    prod = {}
  }
- 跑出來 each.key 就會是 [logs, security, shared, dev, stage, prod] 正好是我們這次需要 provision 的六個 aws organization accounts,滿足目前的需求
- each.value[“email”] 則依序帶入各自的 email 到 account 中
NOTE: 這些 email 請使用你收得到的 email
- 在現實中這會是六組不同的 email,email 重複的話會被 aws api reject,所以需要使用不同的 email
- 或是跟 gruntwork guide 一樣,使用 gmail 帳號後+ 的字元會 ignore
- 如果設定了收不到信的 email 作為 account email 就會有點麻煩
- 不要像我一樣設了 6 個收不到 email,只好再多開一個 account XD,還好我們是在 workshop
這個 terraform module 的寫法完全忽略其他 each.value 內的值
- 我們並不清楚 gruntwork 在 private 的 terraform module 中,遮些參數的確切用途,以及對 aws organization account 設定有何影響
- 但以筆者使用 aws 的經驗,大概猜得出來這些參數的用途,以及 terraform module 應該如何調整,為了課程進度安排,我們先暫時忽略。繼續照著 gruntwork 的文件做下去,之後有用到再來補
Terragrunt Plan & apply
在跑 terragrunt 之前,我們先要切換成 root account 的 iam User,昨天新建的 IAM User,存放在密碼企理,還記得嗎?
- 使用 aws-vault 拿 IAM User 的 access key 做 programatic 登入,提供 terraform credential。而非透過 aws web console
記住:我們不能用 root account 做這些工作
aws-vault
由於我們現在要使用 IAM User 做 terraform 來創建新的 child accounts,未來會使用新的 child accounts 來做各個環境中的 terraform 元件操作,我們需要一個工具來協助切換這些 account
我們使用的工具是 aws-vault
- https://github.com/99designs/aws-vault
- 支援很多安裝平台,選自己喜歡用的,或是直接在 github release 頁面下載 binary
$ aws-vault --help

usage: aws-vault [<flags>] <command> [<args> ...]

A vault for securely storing and accessing AWS credentials in development environments.
...
使用 Root Account IAM User 身份執行 terragrunt
在本機紀錄 access key (請好好保護本機的安全)
aws-vault add terraform-30day-root-iam-user
Enter Access Key Id: XXXXXXXXXXXX
Enter Secret Key: YYYYYYYYYYYY
透過 aws-cli 取得 caller identity,也就是現在的身份是誰,確定是 Administrator
- 從 aws 的角度,所有操作都是 IAM User: Administrator 操作的
- 只能操作當初建立 IAM User 時 attach 的權限(蘇然也是很大)但已經比 root account 小很多
- 之後我們會進一步限縮每一個 IAM User 的 permission
aws-vault exec terraform-30day-root-iam-user -- aws sts get-caller-identity

{
    "UserId": "AIDAxxxxxxxxxxxKGW",
    "Account": "706136188012",
    "Arn": "arn:aws:iam::706136188012:user/Administrator"
}
然後透過 aws-vault 來執行 terragunt,這樣 terragrunt 就會使用 IAM User 的 credential 來操作 provider 去呼叫 aws api
aws-vault exec terraform-30day-root-iam-user -- terragrunt init

aws-vault exec terraform-30day-root-iam-user -- terragrunt plan

Terraform will perform the following actions:

  # aws_organizations_account.account["dev"] will be created
  + resource "aws_organizations_account" "account" {
      + arn               = (known after apply)
      + close_on_deletion = false
      + create_govcloud   = false
      + email             = "terraform30days@outlook.com"
      + govcloud_id       = (known after apply)
      + id                = (known after apply)
      + joined_method     = (known after apply)
      + joined_timestamp  = (known after apply)
      + name              = "dev"
      + parent_id         = (known after apply)
      + status            = (known after apply)
      + tags_all          = (known after apply)
    }

  # aws_organizations_account.account["logs"] will be created
  + resource "aws_organizations_account" "account" {
      + arn               = (known after apply)
      + close_on_deletion = false
      + create_govcloud   = false
      + email             = "terraform30days@outlook.com"
      + govcloud_id       = (known after apply)
      + id                = (known after apply)
      + joined_method     = (known after apply)
      + joined_timestamp  = (known after apply)
      + name              = "logs"
      + parent_id         = (known after apply)
      + status            = (known after apply)
      + tags_all          = (known after apply)
    }

  # aws_organizations_account.account["prod"] will be created
  + resource "aws_organizations_account" "account" {
      + arn               = (known after apply)
      + close_on_deletion = false
      + create_govcloud   = false
      + email             = "terraform30days@outlook.com"
      + govcloud_id       = (known after apply)
      + id                = (known after apply)
      + joined_method     = (known after apply)
      + joined_timestamp  = (known after apply)
      + name              = "prod"
      + parent_id         = (known after apply)
      + status            = (known after apply)
      + tags_all          = (known after apply)
    }

  # aws_organizations_account.account["security"] will be created
  + resource "aws_organizations_account" "account" {
      + arn               = (known after apply)
      + close_on_deletion = false
      + create_govcloud   = false
      + email             = "terraform30days@outlook.com"
      + govcloud_id       = (known after apply)
      + id                = (known after apply)
      + joined_method     = (known after apply)
      + joined_timestamp  = (known after apply)
      + name              = "security"
      + parent_id         = (known after apply)
      + status            = (known after apply)
      + tags_all          = (known after apply)
    }

  # aws_organizations_account.account["shared"] will be created
  + resource "aws_organizations_account" "account" {
      + arn               = (known after apply)
      + close_on_deletion = false
      + create_govcloud   = false
      + email             = "terraform30days@outlook.com"
      + govcloud_id       = (known after apply)
      + id                = (known after apply)
      + joined_method     = (known after apply)
      + joined_timestamp  = (known after apply)
      + name              = "shared"
      + parent_id         = (known after apply)
      + status            = (known after apply)
      + tags_all          = (known after apply)
    }

  # aws_organizations_account.account["stage"] will be created
  + resource "aws_organizations_account" "account" {
      + arn               = (known after apply)
      + close_on_deletion = false
      + create_govcloud   = false
      + email             = "terraform30days@outlook.com"
      + govcloud_id       = (known after apply)
      + id                = (known after apply)
      + joined_method     = (known after apply)
      + joined_timestamp  = (known after apply)
      + name              = "stage"
      + parent_id         = (known after apply)
      + status            = (known after apply)
      + tags_all          = (known after apply)
    }

    # aws_organizations_account.account["prod"] will be created
    + resource "aws_organizations_account" "account" {
      + arn               = (known after apply)
      + close_on_deletion = false
      + create_govcloud   = false
      + email             = "chechiachang999+terraform-test@gmail.com"
      + govcloud_id       = (known after apply)
      + id                = (known after apply)
      + joined_method     = (known after apply)
      + joined_timestamp  = (known after apply)
      + name              = "prod"
      + parent_id         = (known after apply)
      + status            = (known after apply)
      + tags_all          = (known after apply)
    }

    # aws_organizations_organization.org will be created
    + resource "aws_organizations_organization" "org" {
      + accounts                      = (known after apply)
      + arn                           = (known after apply)
      + aws_service_access_principals = [
          + "cloudtrail.amazonaws.com",
          + "config.amazonaws.com",
        ]
      + feature_set                   = "ALL"
      + id                            = (known after apply)
      + master_account_arn            = (known after apply)
      + master_account_email          = (known after apply)
      + master_account_id             = (known after apply)
      + non_master_accounts           = (known after apply)
      + roots                         = (known after apply)
    }

Plan: 8 to add, 0 to change, 0 to destroy.
Terragrunt plan 後產生 terraform plan,我們要仔細 review
- 0 change / 0 delete,這邊很重要,確定我們不會改錯或是誤刪已經存在的 aws 元件
- 7 to add,新增了 7 個 aws 元件
- 一個 aws_organization
- 六個 aws_organization_account,對應未來的六個環境
- 一個 aws_organization_account,因為上面 email 設錯卡住,而多開一個 test 環境XD
review 沒問題後,我們進行 apply
aws-vault exec terraform-30day-root-iam-user -- terragrunt apply

aws_organizations_account.account["logs"]: Creating...
aws_organizations_account.account["stage"]: Creating...
aws_organizations_account.account["prod"]: Creating...
aws_organizations_account.account["security"]: Creating...
aws_organizations_account.account["dev"]: Creating...
aws_organizations_account.account["shared"]: Creating...
aws_organizations_account.account["prod"]: Creating...
aws_organizations_account.account["logs"]: Creating...
aws_organizations_account.account["logs"]: Still creating... [10s elapsed]
aws_organizations_account.account["prod"]: Still creating... [10s elapsed]
aws_organizations_account.account["logs"]: Creation complete after 14s [id=557659608246]
aws_organizations_account.account["prod"]: Creation complete after 14s [id=420896464212]
創建完成 organization 與 organization accounts 後,我們可以進行檢查
到 aws console -> organization 頁面,可以看到新建的 organization 與 accounts
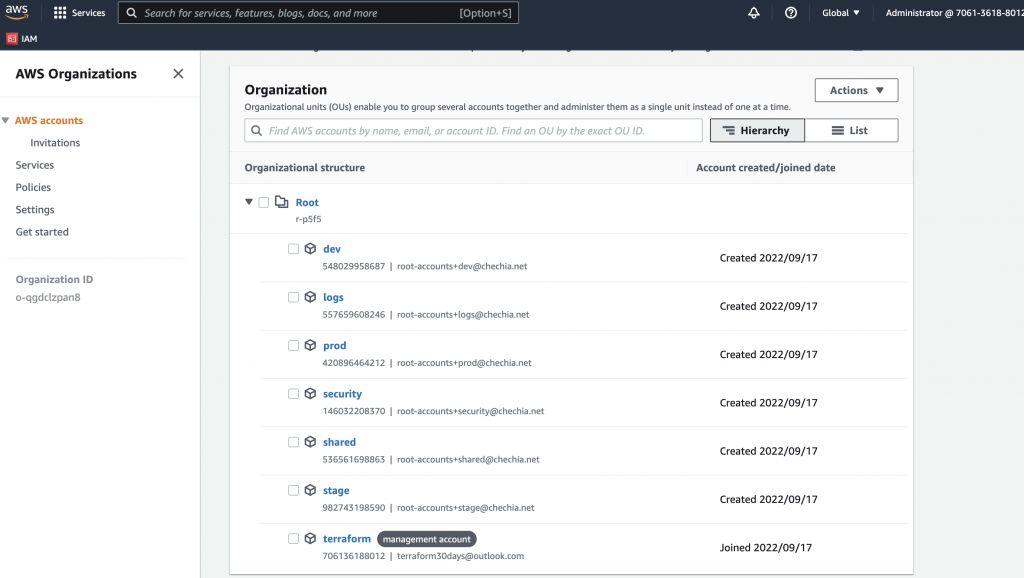
也可以使用 aws-cli 列出 organization 的 accounts
aws-vault exec terraform-30day-root-iam-user --no-session -- aws organizations list-accounts
使用 external module 二三事
使用開源的 terraform module 也是有很多好處
- 首先我們使用的是 aws 維護的 terraform module,如果 aws api 有更新通常都跟得很快
- 開源 module 會有大量的社群幫忙發 issue 討論與 PR review
- 遇到問題可以直接開 issue 問 gruntwork enterprise 的 module 是 enterprise 等級的解決方案,有相當的 code 品質,但在上面幾點自然是不如開源 repository
順便提一下,如果之後要自己動手寫其他元件,應該如何找到適合的 external terraform module?
- 有需要導入其他公有雲的元件 (ex. azure / gcp / …),可以在 registry.terraform.io 上面搜尋找到
- 通常比較大間的 Cloud provider 為了方便使用者,都會維護自家產品的 terraform module,方便使用這直接使用 IaC 的方式導入,可以直接使用自己家推出的 terraform module
- 因為 aws 最熟悉自己家的元件,比較不會出 bug
- 遇到問題可以直接發 issue 讓 aws 的工程師來看
- 如果 registry.terraform.io 上,某個元件找不到自己公司出的 terraform module,那可能就要找看看社群版本的
- 如果 registry.terraform.io 上搜尋不到,可以上 Github 搜尋 “terraform + 元件名稱” 可能找到沒有收錄在 registry 的 terraform module。或是直接 google,偶爾也會有意外收穫
- 沒有 terraform official validated module 就要特別注意安全性
一個好的 terraform module 通常有幾個特徵
- 有良好的更新紀錄在 commit history 中
- 有活躍的社群 發 issue 討論 / PR / review
- 有完整的 changelog 紀錄變更如何時升版,也方便讓使用者升版時檢查
- 時常更新,能夠符合新版的 terraform core version 規格
- 會鎖定 dependency 版本,ex. terraform core version 與依賴的 provider version 反之,如果發現一個 terraform module 年久失修,很少人討論,也沒有跟上 terraform core 版本 (ex. 不支援 1.x) 可能就要考慮一下是否要使用
使用外部 module 應該注意的事情
有時候某些外部 module 會有雷,導致我們去引用時出現錯誤
- 更改已經存在的 tag / 竄改 commit history / … 等
- 或是 repository 移除變不見 / 改名 / 改 url
為了避免我們原本好好的 terraform code 受到影響,如果有使用外部 module,我們可以先 fork 一份外部 module 到 internal repository (clone 一份再 push 到自家的 cvs 上面),然後把 source url 改成 fork internal repository
- 例如本來是 github.com/chechiachang/terragrunt-infrastructure-modules fork (clone & push) 變成 chechia.bitbucket.com/chechia/terragrunt-infrastructure-modules
- source url 中使用 git tag reference,明確指定 internal module (不用 github.com 而用 chechia.bitchecket)
- 需要更新時,在從 github 上 pull 最新的 code,push 到 bitbucket 上,修改 source url 就完成升版 這樣可以將對 external module 的依賴轉乘 loose coupling,降低耦合程度,如果 external module 整個壞掉,我們的 terraform module 使用不受影響。但又能 trace 原先的 external module remote,方便接收更新。
- 缺點是會花一些人力整理這些 forked module repositories
使用 external module 也要注意資訊安全
- 要小心來路不明的 terraform module,terraform module 可以取得很多遠端的私密訊息,可能會有安群性的隱憂
- 沒有 terraform validated 的 terraform module,使用前自己要看過內容
- 看到使用不熟悉的 terraform provider,也應該去檢查 provider 的出處與內容 避免用自己的 aws account 身份執行後,發現被偷埋東西,或是資料洩漏出去
如果發現自己使用的元件比較冷門,符合自己需求的 external module 也年久失修,也可以考慮 hard fork 一版,由團隊自己維護
- 可以參考現有的架構與內容,根據內部的需求去修改 terraform module,最後在自己引用
- 內部維護,自己控制升版與發佈
- 如果不是太複雜的 module 其實可以做
- 做完記得用安全性工具檢查,確保沒有安全隱憂(這個我們稍後幾天的內容會提)
Che-Chia Chang
Site Reliability Engineer
My research interests include Site Reliability Engineering, DevOps, Container and Kubernetes.